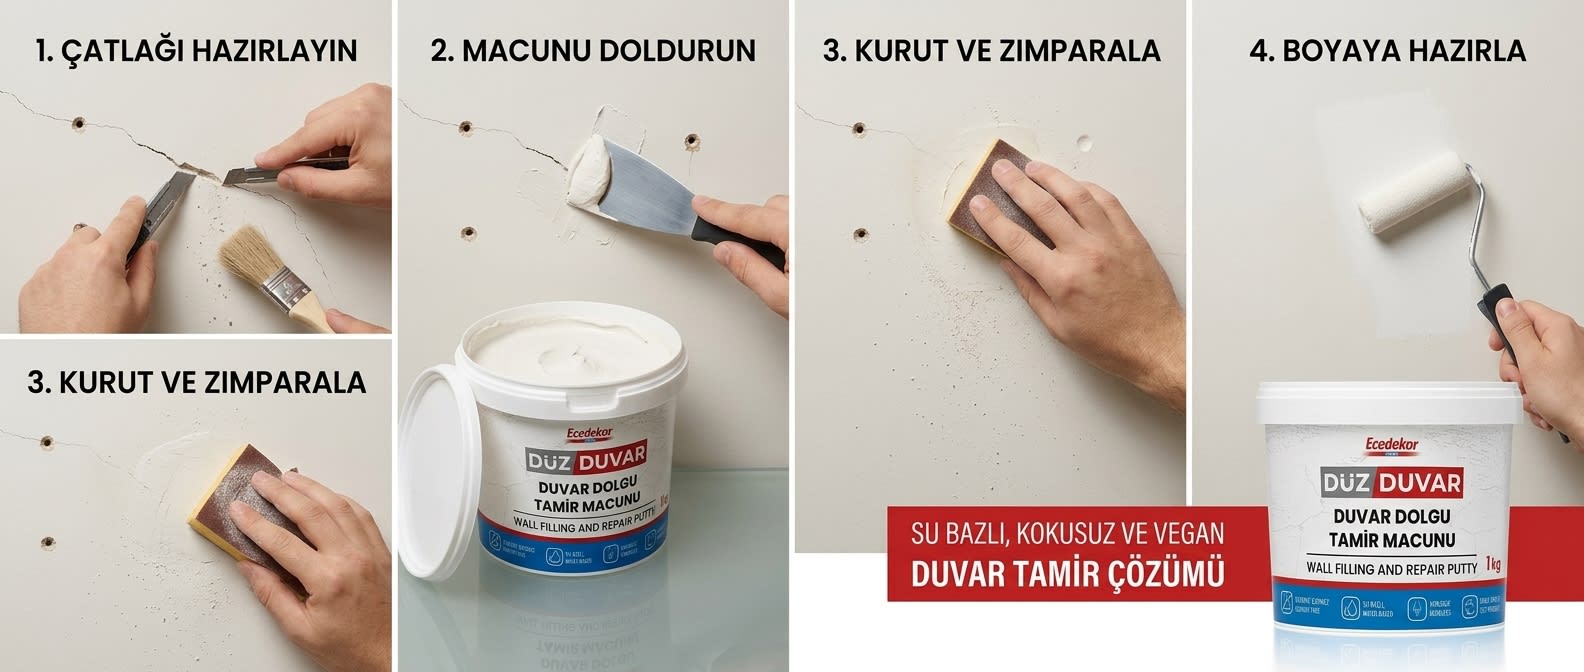
Filling wall cracks and holes with ready-to-use wall spackle is done in four steps: widening the crack and removing any dust, filling it by pressing the spackle in with a putty knife, letting it dry, sanding it down, and preparing the surface for painting. From hairline cracks to screw holes, most interior wall imperfections can be repaired without any special skills using a ready-to-use, water-based wall repair compound. This guide explains the correct method step by step, depending on the type of crack.
First, Identify the Crack
- Hairline cracks: Superficial cracks less than 1 mm wide caused by plaster or paint. These are primarily cosmetic issues and can be filled directly with putty.
- Fine to medium cracks (1–5 mm): Caused by plaster shrinkage, plumbing vibrations, or building settlement. They are slightly widened and then filled.
- Holes: Screw, dowel, or nail holes and small impact cracks. This is the easiest group to repair.
- Structural cracks: Cracks wider than 5 mm, those progressing in a stair-step pattern, those widening at the junction of two walls, or those that repeatedly reappear may indicate a structural problem—consult a structural engineer before filling them with spackle.
Materials Needed
- Wall filler and repair putty (ready-to-use, water-based)
- Steel putty knife (one narrow and one wide)
- Craft knife or corner of a putty knife (for widening the crack)
- 180-220 grit sandpaper or sanding sponge
- Dusting brush / slightly damp sponge
- Primer (for large repairs)
Step-by-Step Wall Filling
1. Prepare the Crack
Scrape away any loose paint over hairline cracks. For cracks wider than 1 mm, gently widen them into a V-shape with a utility knife; this allows the filler to flow into the crack and adhere properly. Then, completely remove all dust with a brush or damp sponge—a dusty surface is the most common cause of putty falling out. For holes, simply remove any remaining dowel or screw residue and press down any raised edges.
2. Apply the Filler
Fill the crack by pressing the putty onto it with a putty knife using crisscross motions; make sure no air pockets remain inside. Use the wide side of the putty knife to smooth the surface down to the level of the wall, even leaving it slightly raised—sandpaper will compensate for any shrinkage as it dries. Fill gaps deeper than 5 mm in two layers, and wait for the first layer to dry.
3. Let It Dry and Sand It
Water-based wall putty typically dries in thin layers within 30–60 minutes; for deep fills, wait a few hours (check the product label for exact drying time). Sand the dried surface with 180-220 grit sandpaper using circular motions until it’s flush with the wall. Check with your hand: if you can’t feel any unevenness, it’s ready.
4. Prepare for Painting
Remove the sanding dust. For large repair areas, apply a primer first, as the spackled area will absorb paint differently; otherwise, the repair may appear as a “shadow” after painting. For small touch-ups, two coats of wall paint are usually sufficient.
Pay Attention to Ceilings and Corners
For cracks in the ceiling, apply several thin layers using a smaller amount of putty to prevent it from running. Cracks at the wall-ceiling junction may reopen due to the building’s natural movement; use flexible filler products in these areas. At the junctions between walls and wood trim (baseboards, door frames), use flexible joint fillers instead of wall putty—rigid filler will crack between two materials that expand at different rates. For repairing the wood side, please refer to our guide on applying wood filler.
Why Do Cracks Reappear?
Cracks that aren’t filled properly (dusty surface, thick layer applied in a single pass) will reopen quickly. Other common causes of recurring cracks include: the settling process in new buildings, plumbing vibrations, and humidity and temperature fluctuations. For moisture-related cracks (such as paint blistering or mold stains), resolve the moisture issue first; the putty will not adhere to a damp surface.
Frequently Asked Questions
What type of putty should be used to fill wall cracks?
For hairline and medium-sized cracks indoors, a ready-to-use, water-based wall filler is sufficient. Ecedekor Smooth Wall is solvent-free, odorless, contains no harmful chemicals, and is vegan-friendly—making it suitable for indoor use, including in children’s rooms. It is designed for indoor use; do not use it on exterior walls.
How long does the wall filler take to dry?
Thin layers typically reach surface dryness in 30–60 minutes; for deep fills, full curing may take several hours. The putty must be completely dry before painting. Exact times are listed on the product label.
How do you fill holes in drywall?
Small screw holes can be filled directly with spackle. For cracks larger than the palm of your hand, first bridge the gap with mesh tape or a patch, then apply two thin layers of spackle and sand it down.
Can you paint directly over the spackle?
For small touch-ups, yes. For larger repair areas, a primer is recommended; the spackled area absorbs paint differently than the wall, and repairs painted without a primer will show a visible line when held up to the light.
For which cracks should I call a professional?
Cracks wider than 5 mm, those that run in a stair-step pattern, those that develop at the joints of load-bearing walls and columns, or those that reopen shortly after being filled may be structural. In such cases, consult a civil engineer before performing cosmetic repairs.
What packaging options are available for bulk purchases?
For professional teams and dealers, our wall repair putties are available in 1 kg packages; you can browse the wall putties category for product varieties and apply for dealership status to learn about wholesale terms.